서론
VMware 워크스테이션 pro를 이용했다.
서버A RockyLinux 9.6 GUI 그래픽모드
서버B RockyLinux8.1 최소설치모드
서버C RockyLinux 9.6 GUI 그래픽모드
root 권한으로 진행
각 서버 SSH서버 Root 권한 허용
*** 모든 작업은 서버A에서만 수행됐다. ***
목표
Ansible Playbook 활용: nfs.yaml 파일을 작성하여 복잡한 설정 과정을 자동화한다.
Ansible Playbook(YAML) 문법 기초 학습 및 적용.
firewalld 및 mount 모듈을 활용한 시스템 설정 실습.
nfs 서버 구축 및 공유 성공
서버A Ansible 설치
EPEL 저장소(확장 패키지) 설치
dnf install -y epel-release

Ansible 설치
dnf install -y ansible

설치 확인
ansible --version
Ansible은 기본 리눅스 저장소(Base OS)에는 없는 경우가 많아, EPEL 저장소를 먼저 설치
SSH 키 생성 및 배포
ssh-keygen 키 생성

Server B로 전송
ssh-copy-id root@192.168.111.200

Server C로 전송
ssh-copy-id root@192.168.111.136
인벤토리 파일 설정
vi /etc/ansible/hosts -> vi 접속 후 아래 내용 추가
[servers]
192.168.111.200 -> B서버 아이피
192.168.111.136 -> C서버 아이피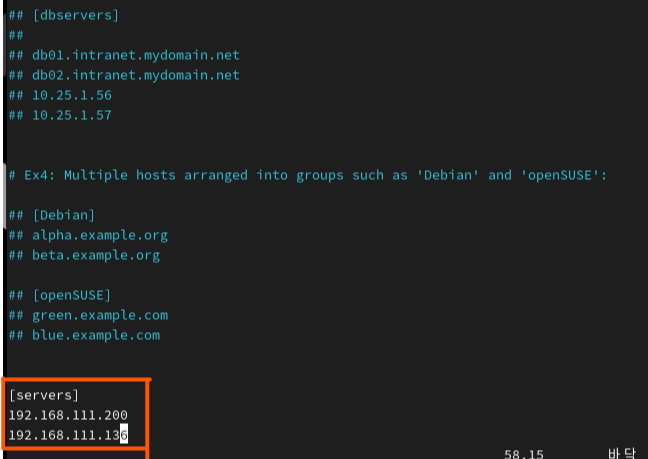
연결 테스트
ansible all -m ping
여기까지 서버A에서의 준비는 끝났다. 이제 nfs.yaml 코드를 작성하고 실행할 차례이다.
vi nfs.yaml 안쪽 코드를 문제 없이 작성하기 위해 'Sublime Text' 를 사용했다.


---
- name: nfs server
  hosts: localhost
  connection: local

  tasks:
  - name: install nfs-utils
    yum:
      name: nfs-utils
      state: latest

  - name: make directory
    file:
      path: /nfsserver
      state: directory
      mode: 0777

  - name: /etc/exports
    lineinfile:
      path: /etc/exports
      line: /nfsserver 192.168.111.0/24(rw,sync,no_root_squash)

  - name: start nfs service
    service:
      name: nfs-server
      state: started
      enabled: yes

  - name: open firewall, nfs
    firewalld:
      service: nfs
      permanent: yes
      immediate: yes
      state: enabled

  - name: open firewall, mountd
    firewalld:
      service: mountd
      permanent: yes
      immediate: yes
      state: enabled

  - name: open firewall, rpcbind
    firewalld:
      service: rpc-bind
      permanent: yes
      immediate: yes
      state: enabled

- name: nfs client
  hosts: servers

  tasks:
  - name: install nfs-utils
    yum:
      name: nfs-utils
      state: latest

  - name: make directory
    file:
      path: /nfsclient
      state: directory

  - name: mount nfs server directory
    mount:
      path: /nfsclient
      src: 192.168.111.100:/nfsserver
      fstype: nfs
      state: mounted
nfs.yaml 안에 코드를 그대로 넣어준다.
작성한 파일에 오타나 문법 오류가 없는지 확인
ansible-playbook nfs.yaml --syntax-check
코드에 오류가 없을 때는 이렇게 나온다.
playbook 실행
ansible-playbook nfs.yaml

failed=0 이 나오면 안된다.
NFS 구축 및 공유 성공
정상 작동 확인
직접 서버B로 이동해서 확인해보자.
1. 마운트 확인

2. 쓰기 권한 테스트


** 궁금하신 부분 댓글 남겨주시면 아는 선에서 최대한 빠르게 답변 남겨드리겠습니다.
** 틀린 부분 있을시 댓글로 남겨주시면 더 공부하겠습니다.
'Linux' 카테고리의 다른 글
| KVM 설치하기_[Rocky Linux] (0) | 2025.11.23 |
|---|---|
| KVM 이해하기 (리눅스 가상화 개념)_[Rocky Linux] (0) | 2025.11.22 |
| Ansible 기초. Ad-Hoc을 이용한 Nginx 웹 서버 구축_[Rocky Linux] (0) | 2025.11.19 |
| Apache 웹 서버 소스 코드 설치_[Rocky Linux] (0) | 2025.11.12 |
| 웹서버(Apache)&DNS 서버 구축 기초 실습_[Rocky Linux] (1) | 2025.11.09 |